
Welcome back to “Learn Linux Easily: A Comprehensive Guide for Beginners and Intermediates PART-2“.
If you’re just joining us now, I strongly recommend you start with Part-1 of this guide, where we have covered the basics of Linux and its command line. Part-2 will cover more advanced topics such as network, user, package, and file operations etc. and it’s essential to have a strong foundation before diving into these concepts. So, take a moment to review Part-1, follow along with the commands, and then come back to Part-2 to continue your journey towards mastering Linux. I’ll be here to guide you every step of the way!
Read : Learn Linux Easily: A Comprehensive Guide for Beginners and Intermediates PART-1
If you’ve already gone through Part 1 of this guide, then you’re in the right place. Let’s continue our journey together and explore more on advanced Linux stuff !!
So In this section, we’ll be diving into some advanced Linux commands related to network, users, packages, and file operations. We’ll cover how to manage users and groups, configure network interfaces, install and remove packages, and perform various file operations such as permissions and ownership. By the end of this section, you’ll have a deeper understanding of how Linux works and be able to perform more complex tasks with ease.
So, grab your Linux distribution and a cup of coffee, and let’s roll! 😎
Note: I will be using my Linux Distro i.e. UBUNTU for this purpose that I have installed in my Virtual Machine.
So in case you haven’t installed your favorite distro yet! You can check out my below article which gives you a step by step process to successfully install and get started with Linux
Read More: How to install Linux on your Windows or Mac Operating System easily
Dive Deep and Learn Linux – Mastering the Most Crucial Linux Commands
1. Hostname Command :
a) To display the hostname of a system:
[ root@ip ] hostname
ip
b) Display the IP Only
[ root@ip ] hostname -i
172.0.0.1 (example)
Note: IP address displayed with the hostname -i may not necessarily be the actual IP address of the system, especially if the hostname has multiple IP addresses associated with it.
2. ifconfig Command : To get the related IP network gateway addresses
[ root@ip ] ifconfig
…..
3. Command to view the os-release
[ root@ip ] cat /etc/os-release
…..
4. Commands related to Package :
a) Installing / updating a package
[ root@ip ] yum install packageName
OR
[ root@ip ] sudo apt-get update
[ root@ip ] sudo apt-get install packageName
Note: If you are logged as a super user already before, which you can do by hitting this command in your terminal → [ root@ip ] sudo su
Then you don’t need to provide sudo every time while installing any software or basically performing any operation that requires admin rights !! For example the below commands will work fine.
[ root@ip ] apt-get update
[ root@ip ] apt-get install packageName
Same applies to the following commands too.
b) Installing a package (file)
[ root@ip ] yum install package.rpm
OR
[ root@ip ] dpkg –install package.deb
c) Removing a package
[ root@ip ] yum remove package name
OR
[ root@ip ] sudo apt-get remove packageName
d) Getting details of all the installed packages
[ root@ip ] dpkg –list
e) Check for package upgrades:
[ root@ip ] yum check-update
OR
[ root@ip ] sudo apt-get -s upgrade
[ root@ip ] sudo apt-get -s dist-upgrade
f ) Upgrade packages
[ root@ip ] yum update -y
OR
[ root@ip ] sudo apt-get upgrade -y
5. Command to start / stop a server “Apache2” (For example)
[ root@ip ] service apache2 start/stop
[ root@ip ] service apache2 status (This confirms the actual status of our server)
6. Command to see the installation directory of a package Or rather confirm whether the PKG got installed successfully :
[ root@ip ] which apache2
/usr/sbin/apache2
7. Command to enable / disable a service at boot
Check this pic to get a clear picture of how the service at boot commands differ for different popular distros 👇🏻
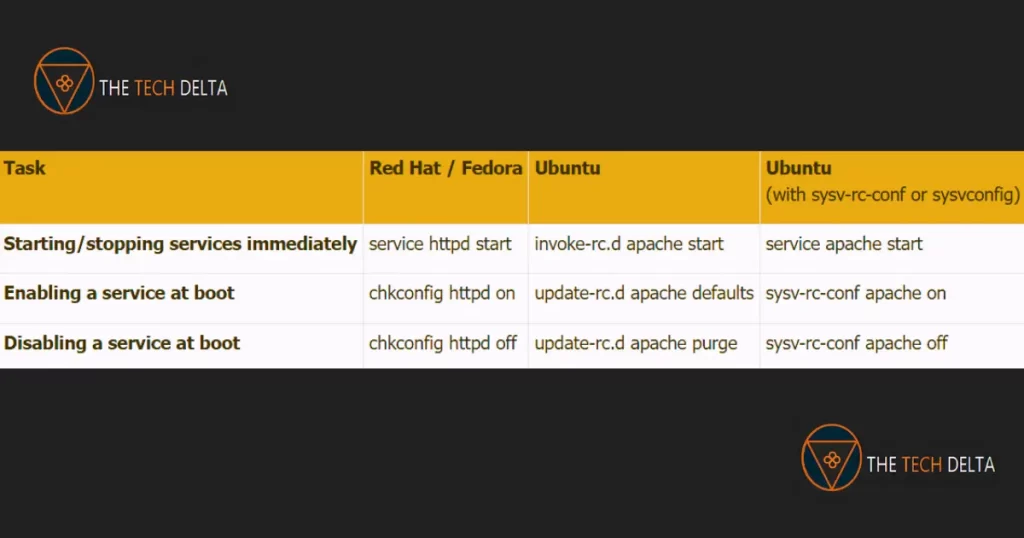
Note: In terms of server boot settings, it’s worth noting that Red Hat and Fedora typically default to runlevel 3, whereas Ubuntu defaults to runlevel 2. When starting or stopping services, you can use various commands, including the service and invoke-rc.d commands, or by executing the appropriate init scripts. For instance, on Ubuntu, you could start the Apache service by running /etc/init.d/apache start, while on Red Hat and Fedora, you would instead use /etc/init.d/httpd start.
8. Whoami Command : This command helps you to know the current user
[ root@ip ] whoami
root (This is the current user)
9. Echo Command : The echo Command is used for the following purposes.
a) For displaying a message:
[ root@ip ] echo “Hello”
Hello
b) For creating and storing message in a file
[ root@ip ] echo “Welcome” > fileZ
Note: If fileZ is created already then its content will get overwritten with “Welcome” and if not created then first a new empty file named fileZ will be created then Welcome will be written into it
[ root@ip ] cat filez
Welcome
c) For appending something
[ root@ip ] echo “World” >> fileZ
[ root@ip ] cat fileZ
Welcome
World
d) For making the file empty (Clearing)
[ root@ip ] echo > fileZ
[ root@ip ] cat fileZ
No Output ! ( As the file got already cleared)
10. Grep Command : This command is used to search single or multiple keyword(s) in a file.
a) For Single Keyword search
[ root@ip ] grep root /etc/passwdOutput will have root highlighted wherever
the searched word(root) present in the respective lines.
b) For Multiple Keywords search
11. Df Commamd : df command is used to display the amount of available disk space for file systems on which the involved user has appropriate read access.
[ root@ip ] df
……
12. Sort Command : This is used to sort the contents in a file and display it.
……
Note:
(File displayed in sorted manner as per alphabets)
13. Tree Command : This is used to view the hierarchy of directories and files, but before that tree need to get installed
[ root@ip ] yum install tree -y
OR
[ root@ip ] sudo apt-get update
[ root@ip ] sudo apt-get install tree -y
Now navigate to a particular directory whose content you wish to see in a proper easy to understand structure.
Example:
…..
(All the directories, sub-directories and files under them will show in a nice format)
14. Useradd Command : To create user
[ root@ip ] useradd sayak
OR
[ root@ip ] adduser sayak
(User gets created) Use cat command to check
…..
(The Created user is shown)
15. Groupadd Command : To create group
[ root@ip ] groupadd thetechdelta
(Group gets created) Now use cat command to check
…..
Note: If we are creating only a user then the group for it automatically gets created by the user name. The vice versa is not true.
16. Command to add user(s) in a group (Users need to be created at first)
a) Adding single user :
[ root@ip ] gpasswd -a sayak thetechdelta
b) Adding multiple users :
[ root@ip ] gpasswd -M shyam,ram,chris techgrp
17. Command to add password in new users
[ root@ip ] sudo passwd sayak
(You will be prompted to enter a new password for the user. Enter the desired password and press Enter. You will then be prompted to confirm the password. Enter the password again and press Enter)
18. Link (Softlink) : It’s like creating a shortcut
[ root@ip ] ln -s file1 softFile1
(A shortcut of file1 with name softFile1 will be created)
[ root@ip ] ls -l
…..
softfile > file1
19. Link (Hardlink) : It’s like a backup
[ root@ip ] ln file2 backupFile2
(A backup file for file2 with name backupFile2 will be created and both the files will be in sync)
[ root@ip ] ls
…..
20. Tar Command : Tar is an archiver used to combine multiple files into One
a) To combine
[ root@ip ] tar -cvf dirX.tar dirX
(cvf is create, verbose, forcefully)
dirX.tar is the resultant file that will be created and dirX is our target directory.
[ root@ip ] ls
dirX.tar dirX
b) To extract and separate
[ root@ip ] tar -xvf dirX.tar (xvf is extract, verbrose, forcefully)
dirX.tar is the target file that will be extracted.
[ root@ip ] ls
dirX
21. Gzip Command : gzip is a compression tool used to reduce the size of a file.
[ root@ip ] gzip dirX.tar
[ root@ip ] ls
dirX.tar.gz
22. Gunzip Command : gunzip is used to extract the compressed file
[ root@ip ] gunzip dirX.tar.gz
[ root@ip ] ls
dirX.tar
23. Wget Command : A very powerful command in Linux to download anything.
[ root@ip ] wget < url >
24. Access Modes / Permissions :
| Access Modes | File | Directory |
| r (4) | To display content | To list the content |
| w (2) | To modify | To create or remove |
| x (1) | To execute the file | To enter into direc. |
a) Chmod : Used to change the access mode of a file.
METHOD 1
# 1st triplet rwx —> Owner/Root User
# 2nd triplet rwx —> Group
# 3rd triplet rwx —> Others (Users)
# 1 —> Symbolic Link (Softlink OR Hardlink) For file Symbolic link is 1 but for directory it’s 2
# 1st root —> signifies who is the owner?
# 2nd root —> signifies which group?
(By default both are root)
# 0 —> File Size in bytes
# Date
# Time
# FileName
[ root@ip ] chmod 777 dirx
[ root@ip ] ls – l
d rwx rwx rwx …. …. ….
Example – Let’s say I need to give permission like this r_x _wx r_ _
[ root@ip ] chmod 534 filex
(vice versa is also possible i.e command given think of the permission)
Like 536 —> r_x _wx rw_
METHOD 2
u = user OR owner
g = group
o = others
Example for understanding better:
u = rwx (Assign in user )
u + w (Meaning add w in user)
g – x (Meaning remove x from group)
o + r (Meaning add r in others)
Example – Convert d rwx r_x r_ _ to r_ _ rwx _wx
[ root@ip ] chmod u – wx, g + w, o = wx file1
Note:
Don’t give spaces in between comma
For file by default permission set is 644
For dir by default permission set is 755
b) Chown : Change the Owner of file or Directory.
[ root@ip ] chown ram file1
[ root@ip ] ls – l
c) Chgrp : Change the group of file or directory.
[ root@ip ] chgrp devops file1
[ root@ip ] ls – l
Conclusion
Congratulations on completing Part 2 of “Learn Linux Easily : A Comprehensive Guide for Beginners and Intermediates.” In this section, we have covered advanced Linux commands related to network, users, package, and file operations.
By now, you should be feeling much more confident and comfortable using the command line interface. Remember, practice makes perfect, so continue to use and experiment with these commands in your own Linux environment.
I hope you found this guide helpful and informative. Many thanks for following along, and I wish you all the best in your ongoing learning journey! Till then Happy Learning! Happy Linux-ing! 😊
Remember to explore the Guides section for an abundance of invaluable technological insights, ensuring you stay at the forefront of the ever-evolving digital landscape. Follow us on Instagram and Twitter and never miss an update related to the latest and greatest happening there in the tech industry 🔥


