Hey there! If you’re joining me here after diving into my previous piece on Docker basics, a big shoutout to you for continuing on this docker mastery journey 🙌🏻 Your enthusiasm for learning and mastering Docker is genuinely commendable 🔥
For those of you who might have landed directly on this piece, welcome aboard! If you’re just starting your journey with Docker or consider yourself a newbie, I’d heartily recommend taking a detour to my previous article on Docker Basics. It provides a solid foundation that will make this hands-on guide even more beneficial.
Must Read 👉🏻 Unlocking Docker Basics: Learn How Containers Transform Your Workflow
But, if you’re here for a quick revision or brush-up on Docker commands, feel absolutely free to continue 🙌🏻
A Quick Detour – Docker Architecture and Its Components
There’s an optional pit stop I’d recommend, especially for the beginners out there. If you wish to delve deeper into Docker’s intricate architecture and understand the various components at play, do consider checking out my dedicated article on Docker Architecture and its Components.
It’s not mandatory, but I promise it’ll equip you with a clearer understanding and a foundational boost. If you’re a beginner, trust me; this will come in handy 🙂
Read 👉🏻 Understanding Docker Architecture and its Components in Depth for Beginners
Setting the Stage for Demo
Alright, let’s get things set up! On a personal note, I’ll be using my Windows machine for demonstration purposes in this guide. But here’s the great news – whether you’re on Linux, macOS, or any other OS, the Docker commands I’ll be sharing remain the same. So, no worries!
However, a word of caution – if you’re raring to dive into the commands, please ensure Docker is already installed on your system. If it’s not, I’d strongly recommend checking out my guide on How to Easily Install Docker. Get that sorted, then jump right back here 🤗
A Heartfelt Request from my side – Practice as You Read 😇
This next bit is crucial. While I cherish every reader, just skimming through won’t do justice to your learning curve. Docker, like many technical subjects, benefits immensely from hands-on practice. So, have your Docker up and running, open up your terminal, and execute each command as we go along. Not only will this solidify your understanding, but trust me, there’s a unique confidence that comes from hands-on experience 🙌🏻
Let’s Dive Into Mastering Docker with Core Commands
1. Checking the Docker version
# docker -v
Every piece of software gets updated over time, and Docker is no exception. Checking its version ensures you’re aware of the features available to you.
C:\TheTechDelta\Sayak\Docker> docker -v

Docker version 20.10.22, build 3a2c30b
The displayed version, in this case, is 20.10.22. It’s recommended to regularly update Docker to access the latest features, improvements, and security patches 🙌🏻
2. For Pulling image from Docker Hub
# docker pull [imageName]
OR
# docker pull [imageName]:[version]
Before you can work with Docker containers, you need images. An image is a lightweight, stand-alone, and executable software package. Docker Hub is like a repository or library for Docker images.
When you want a specific image, you “pull” it. If you don’t specify a version, Docker pulls the latest by default.
C:\TheTechDelta\Sayak\Docker> docker pull openjdk:18

18: Pulling from library/openjdk
  Digest: sha256:159f52a5cc1727c27fc73e3b53a09dad89b62c0c9968deadabd3eb137225a27e
  Status: Downloaded newer image for openjdk:18
  docker.io/library/openjdk:18
Here, as you can see the version 18 of the openjdk image is being pulled. The digest is like a unique fingerprint for this specific image version.
3. Listing all available Docker images
# docker images
To see a list of all Docker images available on your system, you can use the docker images command. This is incredibly useful for quickly checking which images you have, their tags, when they were created, and their sizes.
C:\TheTechDelta\Sayak\Docker> docker images

REPOSITORY    TAG       IMAGE ID       CREATED         SIZE
python        latest    5d77ae66b03b   19 hours ago    925MB
openjdk       18        95a715d25a24   8 days ago      470MB
openjdk       latest    95a715d25a24   8 days ago      470MB
hello-world   latest    feb5d9fea6a5   16 months ago   13.3kB
This output showcases the images you have locally. For instance, you have the python image with the latest tag, two versions of the openjdk image, and the hello-world image.
By regularly checking your available images, you can manage your local Docker environment more efficiently, understanding which images are present and whether you need to pull newer versions or remove older ones.
4. Searching docker images available
# docker search [ImageName]
When you’re looking to pull a new Docker image, you might not always remember the exact name of the image or want to explore available variants.
That’s where the docker search command comes in handy. It allows you to search Docker Hub directly from your terminal to find images related to a specific term.
C:\TheTechDelta\Sayak\Docker> docker search mysql

NAME                       DESCRIPTION                 STARS     OFFICIAL   AUTOMATED
mysql                      MySQL is a widely used, …   13753     [OK]
mariadb                    MariaDB Server is a high…   5248      [OK]
phpmyadmin                 phpMyAdmin - A web inter…   730       [OK]
percona                    Percona Server is a fork…   599       [OK]
databack/mysql-backup      Back up mysql databases …   81
bitnami/mysql              Bitnami MySQL Docker Image  80    	 [OK]
linuxserver/mysql-workbench                            48
ubuntu/mysql               MySQL open source fast…     41
linuxserver/mysql          A Mysql container, brought… 38
circleci/mysql             MySQL is a widely used,…    28
google/mysql               MySQL server for Google…    23        [OK]
5. Running the docker image (This creates a docker container, runs it and exits)
# docker run [ImageName] / [ImageId]
When you execute the docker run command, here’s the behind-the-scenes workflow Docker follows:
- It searches for the specified image locally. If not found, it pulls it from Docker Hub.
- Creates a new container from that image.
- Runs the container.
- After executing the default command within the container, the container exits if the command completes.
Here’s a demonstration:
C:\TheTechDelta\Sayak\Docker> docker run python
{NO OUTPUT}
This command runs the “python” image, but there’s no output because the default command for the Python image (python3) exits immediately if no script is provided.
To see the currently running containers:
C:\TheTechDelta\Sayak\Docker> docker ps
{NO OUTPUT}
There’s no output because the container with the Python image already finished executing and is no longer running.
To view all containers, including the ones that have exited command :
C:\TheTechDelta\Sayak\Docker> docker ps -a

CONTAINER ID   IMAGE       COMMAND   CREATED    STATUS            PORTS  NAMES
1c3eee8229c7   python      "python3" 25 secs…   Exited(0)20 secs…        youth_kilby
599bb579827b   hello-world "/hello"  17 hours…  Exited(0)17 hrs…         youth_clarke
As seen above, the container 1c3eee8229c7 which ran the “python” image has exited. we will discuss this command in detail in the later commands section.
6. Running the image in interactive mode
# docker run –name [ContainerName] -it -d [ImageName]
When working with Docker, there are times you might want to run a container interactively, which means you’ll get a terminal prompt from the container to execute commands inside it. This is particularly useful for debugging or when you want to interactively set up an environment.
Flags Explained:
- –name [ContainerName]: This assigns a human-friendly name to the container, so you can refer to it by this name later.
- -it: This is a combination of two flags:
- -i stands for “interactive”, meaning it’ll keep STDIN open for the container.
- -t allocates a pseudo-TTY, essentially providing you with a terminal inside the container.
- -d: This stands for “detached” mode, meaning the container runs in the background and doesn’t occupy the terminal you’re currently using.
C:\TheTechDelta\Sayak\Docker> docker run --name pythonContainer8 -it -d python

4671271ff2e9b999a945cddf3d01ca158beb45fc42ebe477aaee46c170abd335
This command runs the “python” image interactively in the background, and names the container “pythonContainer8“. The output is the container ID, which is a unique identifier for each container instance.
To check if the container is running:
C:\TheTechDelta\Sayak\Docker> docker ps

CONTAINER ID  IMAGE   COMMAND  CREATED        STATUS       PORTS     NAMES
4671271ff2e9  python "python3" 14 seconds ago Up 10 seconds          pythonContainer8
Here, as you can see the docker ps command lists the running containers. As seen, the “pythonContainer8” container is running the command “python3” and has been active for 10 seconds.
7. Entering and Interacting with Running docker Container
# docker exec -it [ContainerId/ContainerName] [Command]
Once a Docker container is up and running, there may be times you’ll want to enter and interact with the environment inside the container. The docker exec command allows you to do just that.
Flags Explained:
- -it: As previously discussed, this combination ensures an interactive terminal session.
- [ContainerId/ContainerName]: The unique identifier or name for the container you want to enter.
- [Command]: The command you want to run inside the container.
C:\TheTechDelta\Sayak\Docker> docker exec -it 4671271ff2e9 python3This command enters the container with ID 4671271ff2e9 and starts the Python 3 interpreter. Once inside, you can run Python commands as if you were running Python directly on your machine.
Python 3.11.1 (main, Sep 18 2023, 11:11:11) [GCC 10.8.1 20210111] on linux
Type "help", "copyright", "credits" or "license" for more information.

>>> print("Holla")
Holla
>>> exit()

C:\TheTechDelta\Sayak\Docker>
The output showcases that you’re indeed inside a Python environment, and you’ve executed a simple print command. To exit the container’s terminal session and get back to your local terminal, you can use the exit() command.
8. Playing with Web Servers Using Docker 🔥
One of the powerful applications of Docker is to quickly set up and run servers. In this section, we’ll play around with the popular web server: Nginx.
a) Pulling the Nginx Image first
# docker pull nginx
Before you can run an Nginx server, you need its image. Docker makes this simple:
C:\TheTechDelta\Sayak\Docker> docker pull nginxThis command fetches the latest Nginx image from Docker Hub.
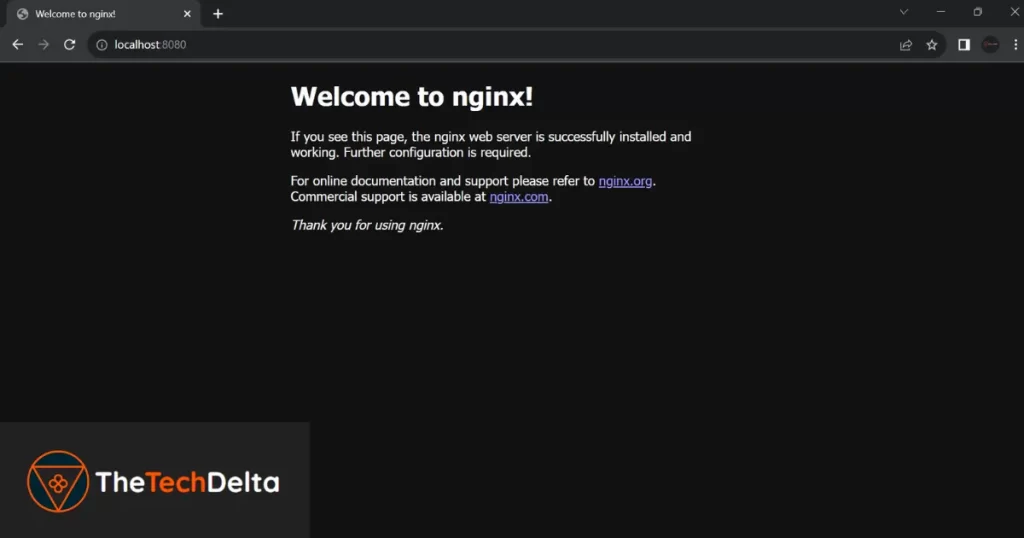
b) Starting an Nginx Server Container
# docker run –name nginxServer -d -p 8080:80 nginx
With the image pulled, you can now run an Nginx container. Here, we’ll also map the server’s port to one on our machine:
C:\TheTechDelta\Sayak\Docker> docker run --name nginxServer -d -p 8080:80 nginxFlags Explained:
- –name nginxServer: Assigns the name “nginxServer” to the container.
- -d: Ensures the container runs in detached mode, in the background.
- -p 8080:80: Maps port 80 inside the container (the default for Nginx) to port 8080 on your machine. This means you can access the Nginx server by visiting http://localhost:8080 in your browser. Check the pic 👇🏻
c) Verifying the Container is Running
# docker ps
Always a good practice, to have a check using the docker ps command for making sure our nginx server is up and running.
9. Managing Docker Containers
Once you’ve initiated Docker containers, regardless of their specific roles or functionalities, you might want to control their running state. Here’s how you can start and stop any container:
a) Starting a Container
# docker start [ContainerName] / [ContainerID]
Containers can be initiated either by their specific name or by their container ID. I prefer name though 😄
C:\TheTechDelta\Sayak\Docker> docker start nginxServer
nginxServer
                              OR

C:\TheTechDelta\Sayak\Docker> docker start 64fa8e2a6e77
64fa8e2a6e77
After executing the command, you can use docker ps to confirm the container is up and running.
b) Stopping a Container
# docker stop [ContainerName] / [ContainerID]
Containers can be initiated either by their specific name or by their container ID
C:\TheTechDelta\Sayak\Docker> docker stop nginxServer
nginxServer
                              OR

C:\TheTechDelta\Sayak\Docker> docker stop 64fa8e2a6e77
64fa8e2a6e77
Once halted, the container will no longer appear as active when you run docker ps.
10. Removing Docker Containers and Images – The Clean Up Process
Over time, as you experiment and work with Docker, you’ll end up with several containers and images. To free up system resources and maintain a clean environment, it’s good practice to remove unnecessary containers and images. Here’s how:
a) Removing Docker Containers
# docker rm [ContainerID1] [ContainerID2] …
If you have containers that you no longer need, you can remove them using the docker rm command.
C:\TheTechDelta\Sayak\Docker> docker rm 64fa8e2a6e77 a1b2c3d4e5f6Upon execution, Docker will display the IDs of the containers that have been removed.
b) Removing Docker Images
# docker rmi [ImageID1] [ImageID2] …
Similarly, to remove images that you no longer require, use the docker rmi command:
C:\TheTechDelta\Sayak\Docker> docker rmi 95a715d25a24 b1c2d3e4f5a6Once done, Docker will show the IDs of the images that have been deleted.
11. Reviewing the Life Cycle of Your Docker Containers
# docker ps -a
It’s essential to keep track of the containers you’ve been working with, especially as you scale your projects and experiments. Docker provides a command to see the history of all containers, regardless of their current state (running, exited, etc.).
The docker ps command is used to list containers, and the -a flag ensures we see all containers, not just the currently active ones.
C:\TheTechDelta\Sayak\Docker> docker ps -a

CONTAINER ID IMAGE COMMAND           CREATED STATUS            PORTS    NAMES
64fa8e2a6e77 nginx "/docker-entryp.…"7d ago  Exited(0)11m ago           nginxServer
ea8330c33546 mysql "docker-entryp.s…"7d ago  Exited(255)6d ago 3306/tcp mysqlDb
8cf9b0327314 openjdk "jshell"        7d ago  Exited(255)6d ago          javaContainer8
4671271ff2e9 python "python3"        7d ago  Exited(255)6d ago        pythonContainer8
Such an overview offers insights for effective container management. Let’s unpack one of the rows to understand the details:
Take, for instance, the container tied to the nginx image:
- Container ID: 64fa8e2a6e77
- Image Used: nginx
- Default Command: /docker-entrypoint…
- Creation Timestamp: 7 days ago
- Last Status: Exited (0) 11 minutes ago
- Name: nginxServer
This indicates a container named nginxServer was created a week ago from the nginx image. Although it’s not currently running, it was active just 11 minutes back. Each row in the output offers similar insights for other containers, empowering you to track and manage your Docker environment seamlessly.
12. Reviving Your Docker Containers – The Restart Command
# docker restart [ContainerName] / [ContainerID]
Docker containers can be stopped and started again, but if you want to simply give a quick refresh or reset to a container, the restart command comes in handy. It’s like turning a switch off and on swiftly, ensuring the application or service in the container starts afresh.
Whether you’re using a human-readable name or the unique container ID, the restart command acts immediately to halt and then run the container.
C:\TheTechDelta\Sayak\Docker> docker restart nginxServer

                              OR

C:\TheTechDelta\Sayak\Docker> docker restart 64fa8e2a6e77
Following the restart, the container nginxServer (or the one with the ID 64fa8e2a6e77) will have been momentarily stopped and then started again.
To make sure the container has restarted and is running use the docker ps command Or, if you want to view all containers, including those not currently active use docker ps -a
The restart command is especially useful in scenarios where you’ve made a configuration change or need to quickly reset a service without delving into separate stop and start commands. It’s a time-saver, ensuring your containerized applications are up and running in no time.
13. Crafting Your First Docker Image
Creating your Docker image is akin to baking your unique cake from scratch. You decide the ingredients, the order, and the final touch. Here’s how to do it:
a) Setting Up Your Workspace
Navigate to the directory where you wish to create your image:
C:\TheTechDelta\Sayak\Docker> mkdir ubuntu-image
C:\TheTechDelta\Sayak\Docker> cd ubuntu-image
C:\TheTechDelta\Sayak\Docker\ubuntu-image>
mkdir command is used to create a new directory. As you can see I have created a new directory named ubuntu-image and then used cd command to enter into the newly created directory.
Now, if you have Visual Studio Code (VSCode) installed and set up to be accessed from the terminal, you can use the following command to open the current directory in VSCode.
C:\TheTechDelta\Sayak\Docker\ubuntu-image> code .Note: This command is specific to VSCode. It launches the editor and directly opens the folder you’re in. I’m using it since I already use VSCode as my Editor for Development purposes.
However, if you don’t have VSCode or prefer another editor, no worries! Simply create a new text file in the directory and save it as “Dockerfile” (with no file extension). Make sure you have the permissions to create files in the directory. Any text editor will do the job, as long as it can save plain text files.
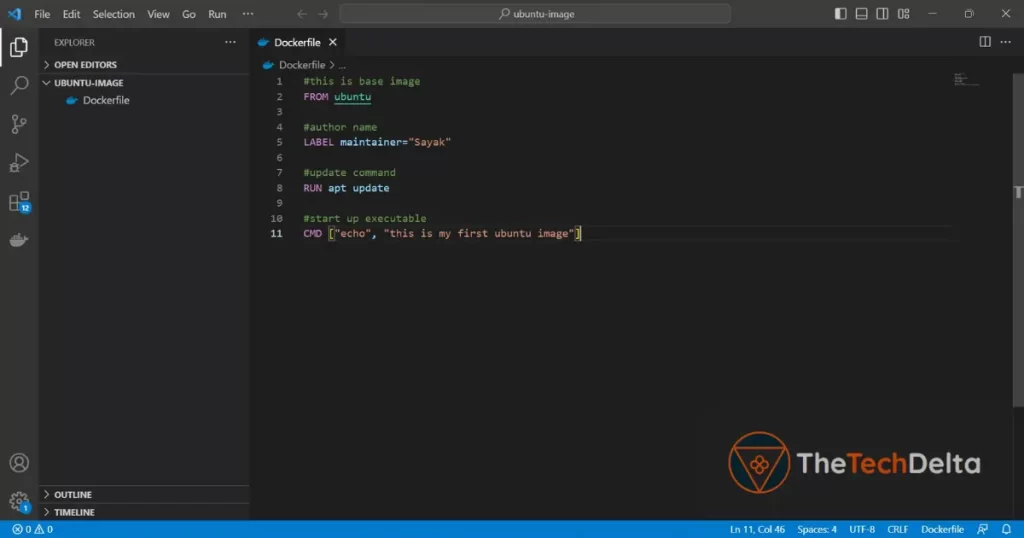
b) Baking Your Recipe – The Dockerfile
The Dockerfile is where you pen down the ingredients and steps for Docker to follow. Here’s a simple breakdown:
- FROM ubuntu : This is your base layer. Think of it as choosing vanilla or chocolate as your cake base.
- LABEL maintainer=”Sayak” : Just as every masterpiece has an artist, every Dockerfile has its author. Here, its me 🤗. You should give your name in Maintainer while creating your Dockerfile.
- RUN apt update : Before we add any decorations to our cake, we ensure everything is fresh. This command updates our base.
- CMD [“echo”, “this is my first ubuntu image”] : The grand finale! When your container starts, it will announce its presence with this statement.
Type out these instructions in your Dockerfile. Your Dockerfile should look like this, Check the pic 👇🏻
Now, we take the recipe (Dockerfile) and ask Docker to bake us a cake (an image).
C:\TheTechDelta\Sayak\Docker\ubuntu-image> docker build -t myubuntuimage .


[+] Building 41.6s (6/6) FINISHED
...
...
Use 'docker scan' to run Snyk tests against images to find vulnerabilities and learn how to fix them
You’re essentially giving Docker a set of instructions. Here’s what each part of the command means:
- docker build : This tells Docker that you want to build a new image.
- -t myubuntuimage : The -t flag allows you to tag your image with a name, in this case, myubuntuimage. Think of it as giving a name to your masterpiece so you can easily find it later.
- . : Now, this little dot is where the magic starts. It tells Docker where to find the Dockerfile (the set of instructions on how to build the image). The dot
.refers to the current directory. So, you’re telling Docker: “Hey, the Dockerfile is right here, in the current directory I’m in.“
In essence, when Docker sees the ‘ . ‘ , it looks for a file named Dockerfile in the current directory, and then uses the instructions in that file to build the image. By understanding each segment of the command, you’ll find it easier to adapt and use other Docker commands in various situations.
After the process completes, check your freshly baked cake:
C:\TheTechDelta\Sayak\Docker\ubuntu-image> docker images

REPOSITORY      TAG       IMAGE ID       CREATED          SIZE
myubuntuimage   latest    89f2eee4e8d1   18 minutes ago   111MB
python          latest    5d77ae66b03b   8 days ago       925MB
nginx           latest    9eee96112def   8 days ago       142MB
mysql           latest    05b458cc32b9   11 days ago      517MB
openjdk         18        95a715d25a24   2 weeks ago      470MB
openjdk         latest    95a715d25a24   2 weeks ago      470MB
hello-world     latest    feb5d9fea6a5   16 months ago    13.3kB
Among the list, you’ll see your creation, myubuntuimage, proudly sitting there.
d) Tasting the Cake – Running the Image 🙌🏻
After all that work, it’s time to see the fruits of our labor. In culinary terms, we’ve prepped the ingredients, followed the recipe, baked the cake, and now it’s the moment of truth – the tasting.
C:\TheTechDelta\Sayak\Docker\ubuntu-image>docker run --name myUbuntuContainr myubuntuimage

this is my first ubuntu image

C:\TheTechDelta\Sayak\Docker\ubuntu-image>- With docker run, we’re telling Docker: “Serve up a slice of the ‘cake’ (or container) I just made.”
- The –name myUbuntuContainr part? Think of it as naming your creation. Maybe you’d call your cake “Chocolate Dream” or “Vanilla Bliss”. Here, we’re christening our container “myUbuntuContainr”.
- Finally, by specifying myubuntuimage, it’s as if you’re telling Docker: “Remember that specific cake recipe I followed? (the image) Use that one!”
When the command runs smoothly, Docker brings our creation to life. Our container, named myUbuntuContainr, boots up using the ‘recipe’ we provided in myubuntuimage.
So, let’s enjoy this moment. After all the meticulous steps and patience, we get to see our Docker creation in action – our digital cake is ready to be savored 🙌🏻. Bon Appétit! 🍰
Conclusion
Congratulations! Making it to this point shows your dedication and progress in unraveling the intricacies of Docker. Navigating this container realm can be daunting for beginners, but each step you’ve taken, every command you’ve executed, has steadily unveiled Docker’s immense potential.
Always bear in mind that every seasoned expert started where you are now. The challenges, the occasional errors, and the triumphant moments when commands executed flawlessly – they’re all milestones in your journey to tech mastery.
And as you continue to expand your Docker prowess, know that this is just the beginning. Just over the horizon lies an even more exhilarating adventure: the world of Kubernetes. A realm where you orchestrate containers, manage vast clusters, and truly harness the power of scalable, resilient systems. And guess what? I’ll be right there with you, guiding you through every twist and turn.
As you embrace your achievements, let that zeal for knowledge shine even brighter. Gear up, because our tech expedition has only just begun. With every leap, remember the potential within you is boundless. So, until our next tech rendezvous, happy Dockering, and keep that anticipation alive for the wonders of Kubernetes! 🚀
I hope you found this detailed article on Docker helpful and informative. Many thanks for following along, and I wish you all the best in your ongoing learning journey! Till then Happy Learning !!😊
Remember to explore the Learn section for an abundance of invaluable technological insights, ensuring you stay at the forefront of the ever-evolving digital landscape. Follow us on Twitter and Instagram and never miss an update related to the latest and greatest happening there in the tech industry 🔥


Extremely valuable article on Docker. Highly appreciated 😊